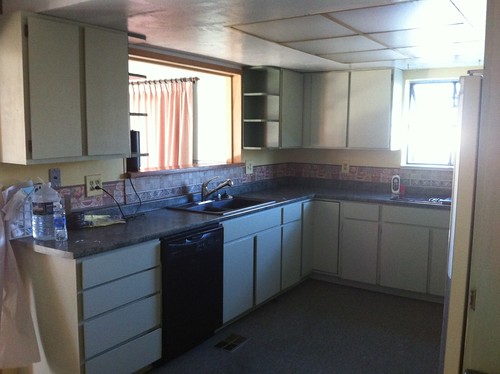
I have almost no pictures of the "before" kitchen. It was so awful I took one shot of it the day we moved in and tried to pretend it wasn't that bad.
Hangover-green cabinets, greeny-blue carpet, greeny-blue countertops, Kountry Kitchen wallpaper border broken up by brown/blue tile backsplashes.
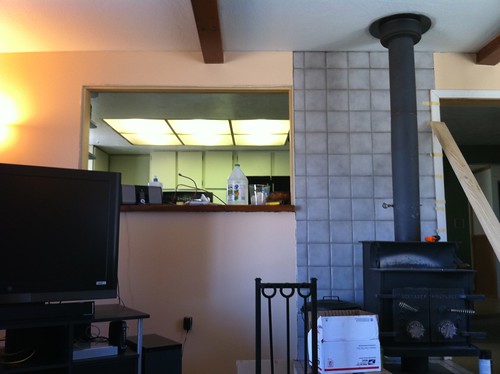
Here's the pass-through window, so you can kinda sense the creeping greenness of the cabinets.
My goal was to somehow make the countertop work, preferably the tiles too, and spend as little as possible. After months of thinking about it, I decided to go with a sandy tan for the walls and lightest off-white tan for the cabinets. The tan walls would pick up on the tan in the backsplash tiles, the blue in the backsplash tiles brings out the blue in the countertops (I seriously thought the countertops were green and BLACK for ages), and if the two open walls at the table end of the kitchen weren't DARK GREEN it wouldn't look so cavernous.
Seriously. They were DARK GREEN.
So on January 7 I set out to fix up the kitchen. Today, February 3, I am calling the project 95% done.

Everybody loves the Weird One - he crept into the kitchen one day and somehow got a blue microfiber cleaning cloth balanced on his forehead.

That pleased him so much that he made a very strange sighing purring growling noise and laid down against the fridge for a nap with his blankey.

Anyway!
This bugged me. It bugged me like you wouldn't believe. Yellow "brass" fluorescent light fixture with paint slopped all over it.

So I fixed it. I masked the fixture off, inside and out, made an enormous spray tent with brown paper, and sprayed the whole thing with that hammered nickel Rustoleum. It looks pretty nice now, and I only spent $8 on a can of paint. Yes, it would look way better with a completely new fixture, but that defeats the budget part of the remodel.

I think the tile actually ties the walls and the countertops together now.

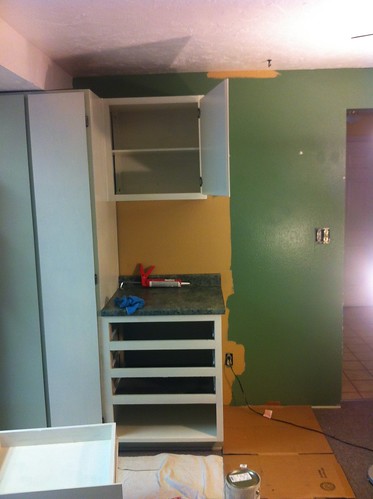
Let me torture you with one more before pic. DARK GREEN checkered wallpaper, no molding around the doorway (because the jamb is too wide), and a DARK GREEN shelf to really bring out the "moldy fenceboards" look of the wallpaper.

With the overwhelming DARK GREEN gone, the wallpaper is pretty inoffensive.

I discovered a super cool new toy, too. You're either gonna be all pfft who didn't know about that? or all OMG THAT'S AMAZING! You know how some of your outlets and switches are set too far back into the wall? Maybe when you go to plug something in, the whole outlet feels squishy. What you need is spacers. They fit on the outlet screws, between the (often blue plastic) work box and the electrical device itself. I will take pics if you're interested. All my kitchen plugs line up perfectly with the switch plates now!
I'm waiting on a giant pull to use as a towel rack under the range. Despite buying exactly the right number of door pulls, I somehow managed to lose two of them in the four days between buying them and installing them, so I need to go buy two more and finish putting the handles up. We might rip out the carpet, and I don't want to put baseboard and door trim down today if I'm going to pull the flooring in a month, so I'm waiting on that. I need to touch up the pass-through window at some point and get the cabinet-to-trim line crisp. But other than that, I am done.
You did a GREAT job on the kitchen. Your color choices really did pull the room together. I'm impressed!!
ReplyDeleteThank you! :D
ReplyDeleteThe tiles absolutely tie the walls and cabinets together - you handy little devil you. Awesome job - it looks 1000% better.
ReplyDeleteLove that hammered rustoleum paint. It's great when you don't really feel like scraping / sanding... ;)
Definitely a huge improvement! You did a great job choosing all the colors... it all ties in together quite nicely! :)
ReplyDeleteWow, what a lot you got done, and what a big improvement. The light fixture paint is genius!
ReplyDeleteVery nice! I think you need to pull down one of those bottles up high and have a drink now, don't you?
ReplyDeleteWow! It looks 100% better now! Sooo much better. There was entirely too much green in that kitchen. Fantastic job on the light fixture too.
ReplyDeleteForget going to California and trying to find a job. Come to Vancouver Island and remodel my kitchen for me, wouldya?
ReplyDeleteI think the way you fixed the fixture with that hammered paint is AWESOME. I'm trying to find applications around my house right now.
ReplyDelete...shuffles off...
I think you should go into business as a Decorator, or a handy man/woman!
ReplyDeleteI was laughing at your before descriptions because I'm pretty sure that's what the poor soul who buys Bryce's house in the future is going to be saying. Seriously. Everything in here is varying shades of green.
ReplyDeleteThe new kitchen looks AWESOME. Good work.
Wow! What a transformation!!
ReplyDeleteYour kitchen looks really nice now.