
The forecast earlier this week had a low of 19 Friday night and a high of 43 on Saturday. Today's forecast calls for a low of 34 with calm winds Friday night, and a high of 46, calm winds, and a 40% chance of precip on Saturday. I would feel like an asshole having my horse hi-tied with a blanket in a blizzard, but the Friday night forecast is not bad at all.
And on the Funder Comfort Front, I have completed my latest redneck trailer modifications. Thanks for the good suggestions (especially CG and cndcowgirl, for the board idea, and AareneX for the buddy heater). I know Caitlin wanted deets on the mod, so here's what I did.
This is one of my fastest projects ever, from idea to usability, so I feel like there's a lot of little details I've missed. Here's what I thought of, though:
I wanted a solution that would fit in the bed of the truck. I wanted something that I could put up and take down, in the Nevada Wind, all by myself if need be. I did not want a dark cave, and I did not want to spend TOO much money since this was so last-minute. Of course it has to be horse-safe, and it has to be person/dog safe.
I had two problems: How to block the wind, and how to (safely) shut the trailer with me inside. I spent a good three hours slowly browsing Lowes and Home Depot, and I found one possible solution that exceeded my spur-of-the-moment budget.
You could mount u shaped aluminum channels to the top and bottom of the trailer "windows". Add some bolts at one end, slide your plywood/plexiglass in, and screw in wing nuts at the other end to hold the panels in place. The only problem is that the channels are $10 per 8', and I'd need 7 or 8 of them.
So I went with choice #2, which is not nearly as classy looking but very functional: bolts. I bought a bunch of 1/4" carriage bolts, washers, lock washers, nuts, and acorn nuts.
Since I wasn't planning on making this road-worthy (it just doesn't get THAT cold here!), I went with 1/4" plywood. Well, I think I got 11/32", actually. 1/4" would work, but I'd worry that anything thinner would flex too much in the wind. I had dreams of doing the whole thing in plexiglass, but dag yall, that stuff is expensive! I got one little flimsy piece, 24x36, for like $30.
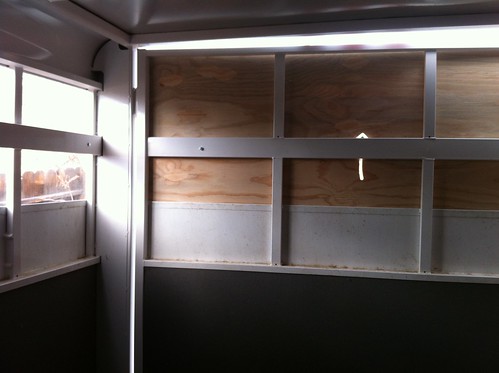
Here's how my trailer window bars are laid out:
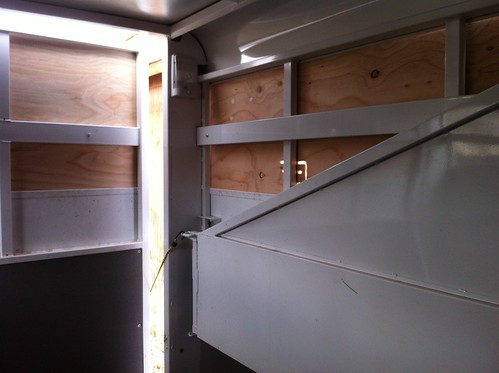
Notice that on the sides, the horizontal bars are on the inside of the vertical bars. The gate is smooth - the horizontals and verticals on it are welded together flat. One of the problems I envisioned with hoisting a piece of plywood over my head and trying to slam it down on some bolts was that the bolts might shift back into their holes. The main reason I went with 1/4" carriage bolts was because I knew I had a 1/4" drill and tap set. For the gate, I drilled and tapped the holes (that means you drill a hole that's slightly smaller than what you need, then you use the tap bit to ream out spirals for the bolts to bolt into - it makes the hole you drilled look like the inside of a nut.) But honestly, that's a pain in the ass, so I mounted my bolts on the inner horizontal bars for the side pieces.
You can see what I did pretty well on the plexi shot:
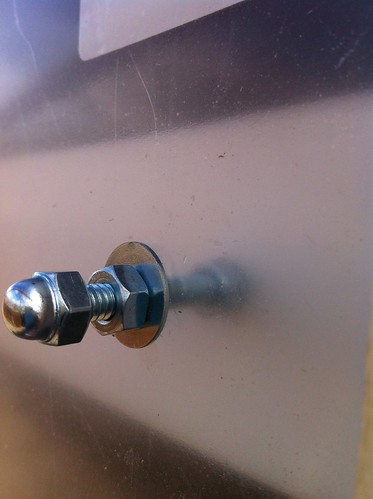
The flat side of the bolt is inside the trailer. There's a nut securing the bolt in place against the trailer bar, then a space, then the wood/plexi, then a washer and a nut. (I ended up swapping out those bolts for some slightly shorter ones, so I don't have to use THREE nuts, just the one against the trailer and one acorn nut holding it all on.)
The easiest way to mark the holes will be to drill and place your bolts and have your helper hold the board on the outside, while you stand on the inside and mark the spots you need to drill. Should you have misplaced your helper, this is the best I came up with: drill and place your bolts, cut your wood to size, and slam it up from below so the top of the wood hits the bottom of the bolts. Mark the wood, drop it, and measure from the top of the windows down to the bolts, then transfer those measurements to the wood. That's what I did. Obviously, there are no pictures of this process.
After I got everything fitted, I primed the outsides so it wouldn't look so horrible - eventually I'll prime and paint both sides. And I routered directions on there, so I wouldn't waste my time trying to hang them upside down and so I won't suffocate.

If you don't have a router and this isn't a good enough reason to go buy one, just drill some air holes. A lot of air holes.
From the inside, it's surprisingly cozy and bright. The window is on the hi-tie side, duh, so I can stand up and glance out at Dixie.
Here's how I solved my second problem of how to shut myself inside.

I bolted some eyebolts in the plywood and "tied" them together with that double-sided camping velcro. It's plenty strong enough to hold the door closed but it would be very fast to undo if I needed out in a hurry. Since the boards won't stay up when the horse is in there, I'm not worried that she's going to put an eye out somehow.
I need to add a couple more bolts and hooks to the plywood. I want one to hang my tiny LED lantern from, and a tiny bolt to hang the carbon monoxide detector, and probably a couple more for reasons I can't think of right now.
I am pretty confident that this will work just fine. We have had Wind for the last two days - I wrestled those boards up for multiple test fittings in honest 40 mph winds. Today I put everything together in gentle 20 mph breezes and went inside with the little buddy heater, and it warmed the space up in about 5 minutes.
Errata:
- I think, instead of using the linchpin, I will padlock the door bar so I can't be accidentally locked inside by some well-meaning clueless asshole.
- I can put the panels on from the ground, but it's easier if I stand on my little stepstool/mounting block that lives in the tack room.
- I still need to go back and drill new weep holes in the horizontal bars, just in case moisture gets in.
As usual, you're a jerry rigging gangster.
ReplyDeleteWill miss not hanging at ROM--we'll swap blog adventure stories on our respective March ride choices soon though!
Yes!
DeleteI'm thinking Cache Creek or SASO in May - you going to either one?
Shine & Shine Only? If so, no, not going. Looking at Cooley ranch in early June and want to do Hat Creek Hustle, possibly both days, later in June, so just Cache Creek in May..
Delete..and so Cache Creek--YES! Was supposed to be our first 50 but *ahem* someone went cuckoo and decided to go to an XP next week instead! Sooo hopefully Cache Creek will be a(nother?) successful 50 for us..
I know a few people who've done and liked CC. I don't know much about either ride though...
DeleteI'm going to SF the last weekend of March, so the two-day Derby LD idea is out. I might do both days of LD at Washoe and if all goes well be ready for a 50 in May. I don't know. I get all angsty. I want easy 50s! I want to be a wuss this year!!
Cool. And good thinking on padlocking the door OPEN. I was wondering how you were going to handle getting locked in. How embarrassing would THAT be?
ReplyDeleteBill
I KNOW RITE!!
DeleteThe bathroom door lock at the facility where we had our clinic this weekend was not functioning correctly, and several people, including the clinician, couldn't get out. And because it was in the corner of another cold-proof space, nobody outside in the barn could hear one calling for help. Won't tell you how I know that...
DeleteFunder you rock. Nuf said. ;)
ReplyDeleteAwesome, that looks like it will work just fine!
ReplyDeletebtw I so want to build a box for the tack area of my trailer, thanks for that idea :)
It's SO nice, I'm so glad I did it. Not too hard either. I just mocked up the curves with a cardboard template til I got them right!
DeleteYou sure are handy to have around! Looks like you worked out the perfect solution and I hope you have a blast at ROM!
ReplyDeleteI wants your +10 skills... seriously. I think my mechanically inclined new roommate may be the new target of me bribing help though I'd like to be able to move around my window as the pony isn't always secured to the same side. Actually he just agreed to help me if I figure out a design... so I'm excited.
ReplyDeleteAll this, and you're trepedatious about a CHAINSAW? Gal, you've already got most of the skillz!
ReplyDeletetrepIdatious? trepidatEous? Cannot spell to save my life.
ReplyDeleteWow. Just wow. That would have taken me months, and a whole lot of swearing.
ReplyDeleteI think that using the lock washers was a great idea. I am very impressed that you were able to make that so fast. Nice work!
ReplyDelete